


Home Teeth Whitening Kit Instructions
6 STEPS : Home Teeth Whitening Kit Instructions.
angelMax Teeth Whitening products are so simple to use. You can whiten your own teeth in 6 easy steps. Please pay attention to the details in these steps. And remember to brush and floss your teeth before each whitening session.
1
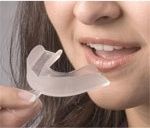
Step 1) Practice Your Trays:
This is the pre-molding step without water. Place the tray over the upper teeth without placing the tray in hot water. Practice with your tongue on the roof of your mouth and touching the inside of the tray. Suck the air out of the tray. When you suck the air out, the trays will fit tighter to your teeth, contouring the tray to the inside surface of your teeth. When finished repeat with the lower tray.
2
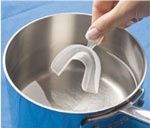
Step 2) Add Hot Water:
For this step, you will use hot but not boiling water. Boil a pan of water about 4” in depth and wait a few minutes for water to cool down a bit. Holding from the tap, dip one tray in the hot water for 5-6 seconds. The hot water will make the tray very pliable and ready to mold. At this stage, trays will tend to stick together and edges will tend to fold onto each other. Avoid twirling the trays and maintain the contour of the trays.
3
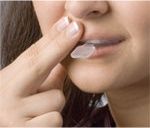
Step 3) Mold Your Trays:
Remove the tray from hot water
vertically
and quickly place the tray around your teeth and suck the air out like you did in Step 1. You can also your fingers and tongue to shape the trays. This will mold the tray to the unique shape of your teeth. You have about 5-10 seconds before the tray cool down. If you are not happy with the fit, you can repeat Steps 2 and 3 several times.
4
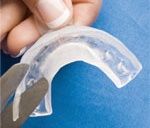
Step 4) Trim Your Trays:
Once you are satisfied with the fit, trim the front tab away from the tray with scissors. Make sure it is flush with the front surface of the tray. If the trays are too deep for your teeth, you can cut the top of the trays.
Custom fitting your trays is very important. Well fit trays keep the gel in touch with your teeth and away from your gums. Poorly molded trays can’t whiten your teeth and your gums may hurt.
5
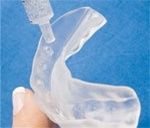
Step 5) Add Whitening Gel:
Place a very small bead of gel per tooth in the frontal portion of the tray for the front 8-9 teeth. You do not need too much gel, a tiny bead will be enough. You do not need more than 0.25 cc gel per tray. The gel might irritate the gums if the trays are overloaded. Insert the trays very carefully keeping the gel on the teeth and away from the gums. If you feel the gel on your gums, take off the trays and clean your gums. You have plenty of gel to start over.
If this is your very first time whitening at home, limit your first session to 5 minutes. Increase the duration of your sessions gradually only if you are comfortable. You can leave the whitening gel on for up to 30 minutes.
Remember to clean your trays after each use.
Before and After Teeth Whitening
Whitening sessions can be done every other day until desired results are accomplished. If you experience sensitivity or gum irritation, discontinue use for 3-5 days and try again.
It is recommended to do touch up whitening sessions twice a month.
After Whitening: You should give your teeth a chance to recover before consuming food and beverages that may stain your teeth. You may want to wait at least 36 hours to consume food or beverages that may stain your teeth, such as coffee, tea, green tea, wine, etc.
Whilst whitening( when the trays are in your mouth), you may swallow any saliva that accumulates in your mouth. The gel contains hydrogen peroxide and other ADA approved ingredients and hence will not harm your health when swallowed in minute quantities. However do not eat the gel and keep it out of reach of children
Whilst whitening( when the trays are in your mouth), you may swallow any saliva that accumulates in your mouth. The gel contains hydrogen peroxide and other ADA approved ingredients and hence will not harm your health when swallowed in minute quantities. However do not eat the gel and keep it out of reach of children

Golden Rules of Teeth Whitening
1-
Start with a 15 minute test session.
Increase duration gradually up to 30 minutes, only if you are comfortable. Each whitening session should last 30 minutes.
2. You may perform up to 3 sessions per day if you want faster results.
3. For beginners, we recommend you start by whitening one arch (either the upper or bottom teeth for 7 days before you proceed to whiten the other arch. This is because most beginners finds it difficult to hold both trays at the same time and also saliva may accumulate in the mouth to dilute the gel. Whitening one arch will also help you compare the the results of the teeth you are whitening with the one you are not whitening to see if you are making quicker progress or not.
5- Make sure you do not use too much gel to overflow the trays.
6- Make sure you cut the top of the trays if they are too big for your teeth. Molding and cutting the trays customized to your teeth is very important. The whitening gel will only work with nicely fit trays. Poorly molded trays will not fit well. As a result the gel will not whiten and your gums will hurt.
6- Make sure you cut the top of the trays if they are too big for your teeth. Molding and cutting the trays customized to your teeth is very important. The whitening gel will only work with nicely fit trays. Poorly molded trays will not fit well. As a result the gel will not whiten and your gums will hurt.
Caution:
This is a strong whitening product. It may irritate your gums. Irritation may last up to 24-48 hours. Please proceed with caution.